How to use your FLIR Thermal Camera

The thermal cameras by FLIR systems, are super easy to use. We have loaned them to over 7,000 customers who have used them to find areas where heat may be escaping from their homes. We've put together a blog to help you make the most out of these brilliant cameras whilst you have it.
Getting started with your FLIR
Connecting your Camera
For wired cameras, simply plug them into your smartphone.
For wireless cameras, connect them via Bluetooth.
Using the FLIR App:
Once connected, open the FLIR app. It will guide you in identifying the exact areas in your home where heat is being lost.
Compatibility Requirements:
You’ll need a smartphone running iOS or Android with a USB-C port. Please note that the cameras are not compatible with adapters.
What to expect when your package arrives
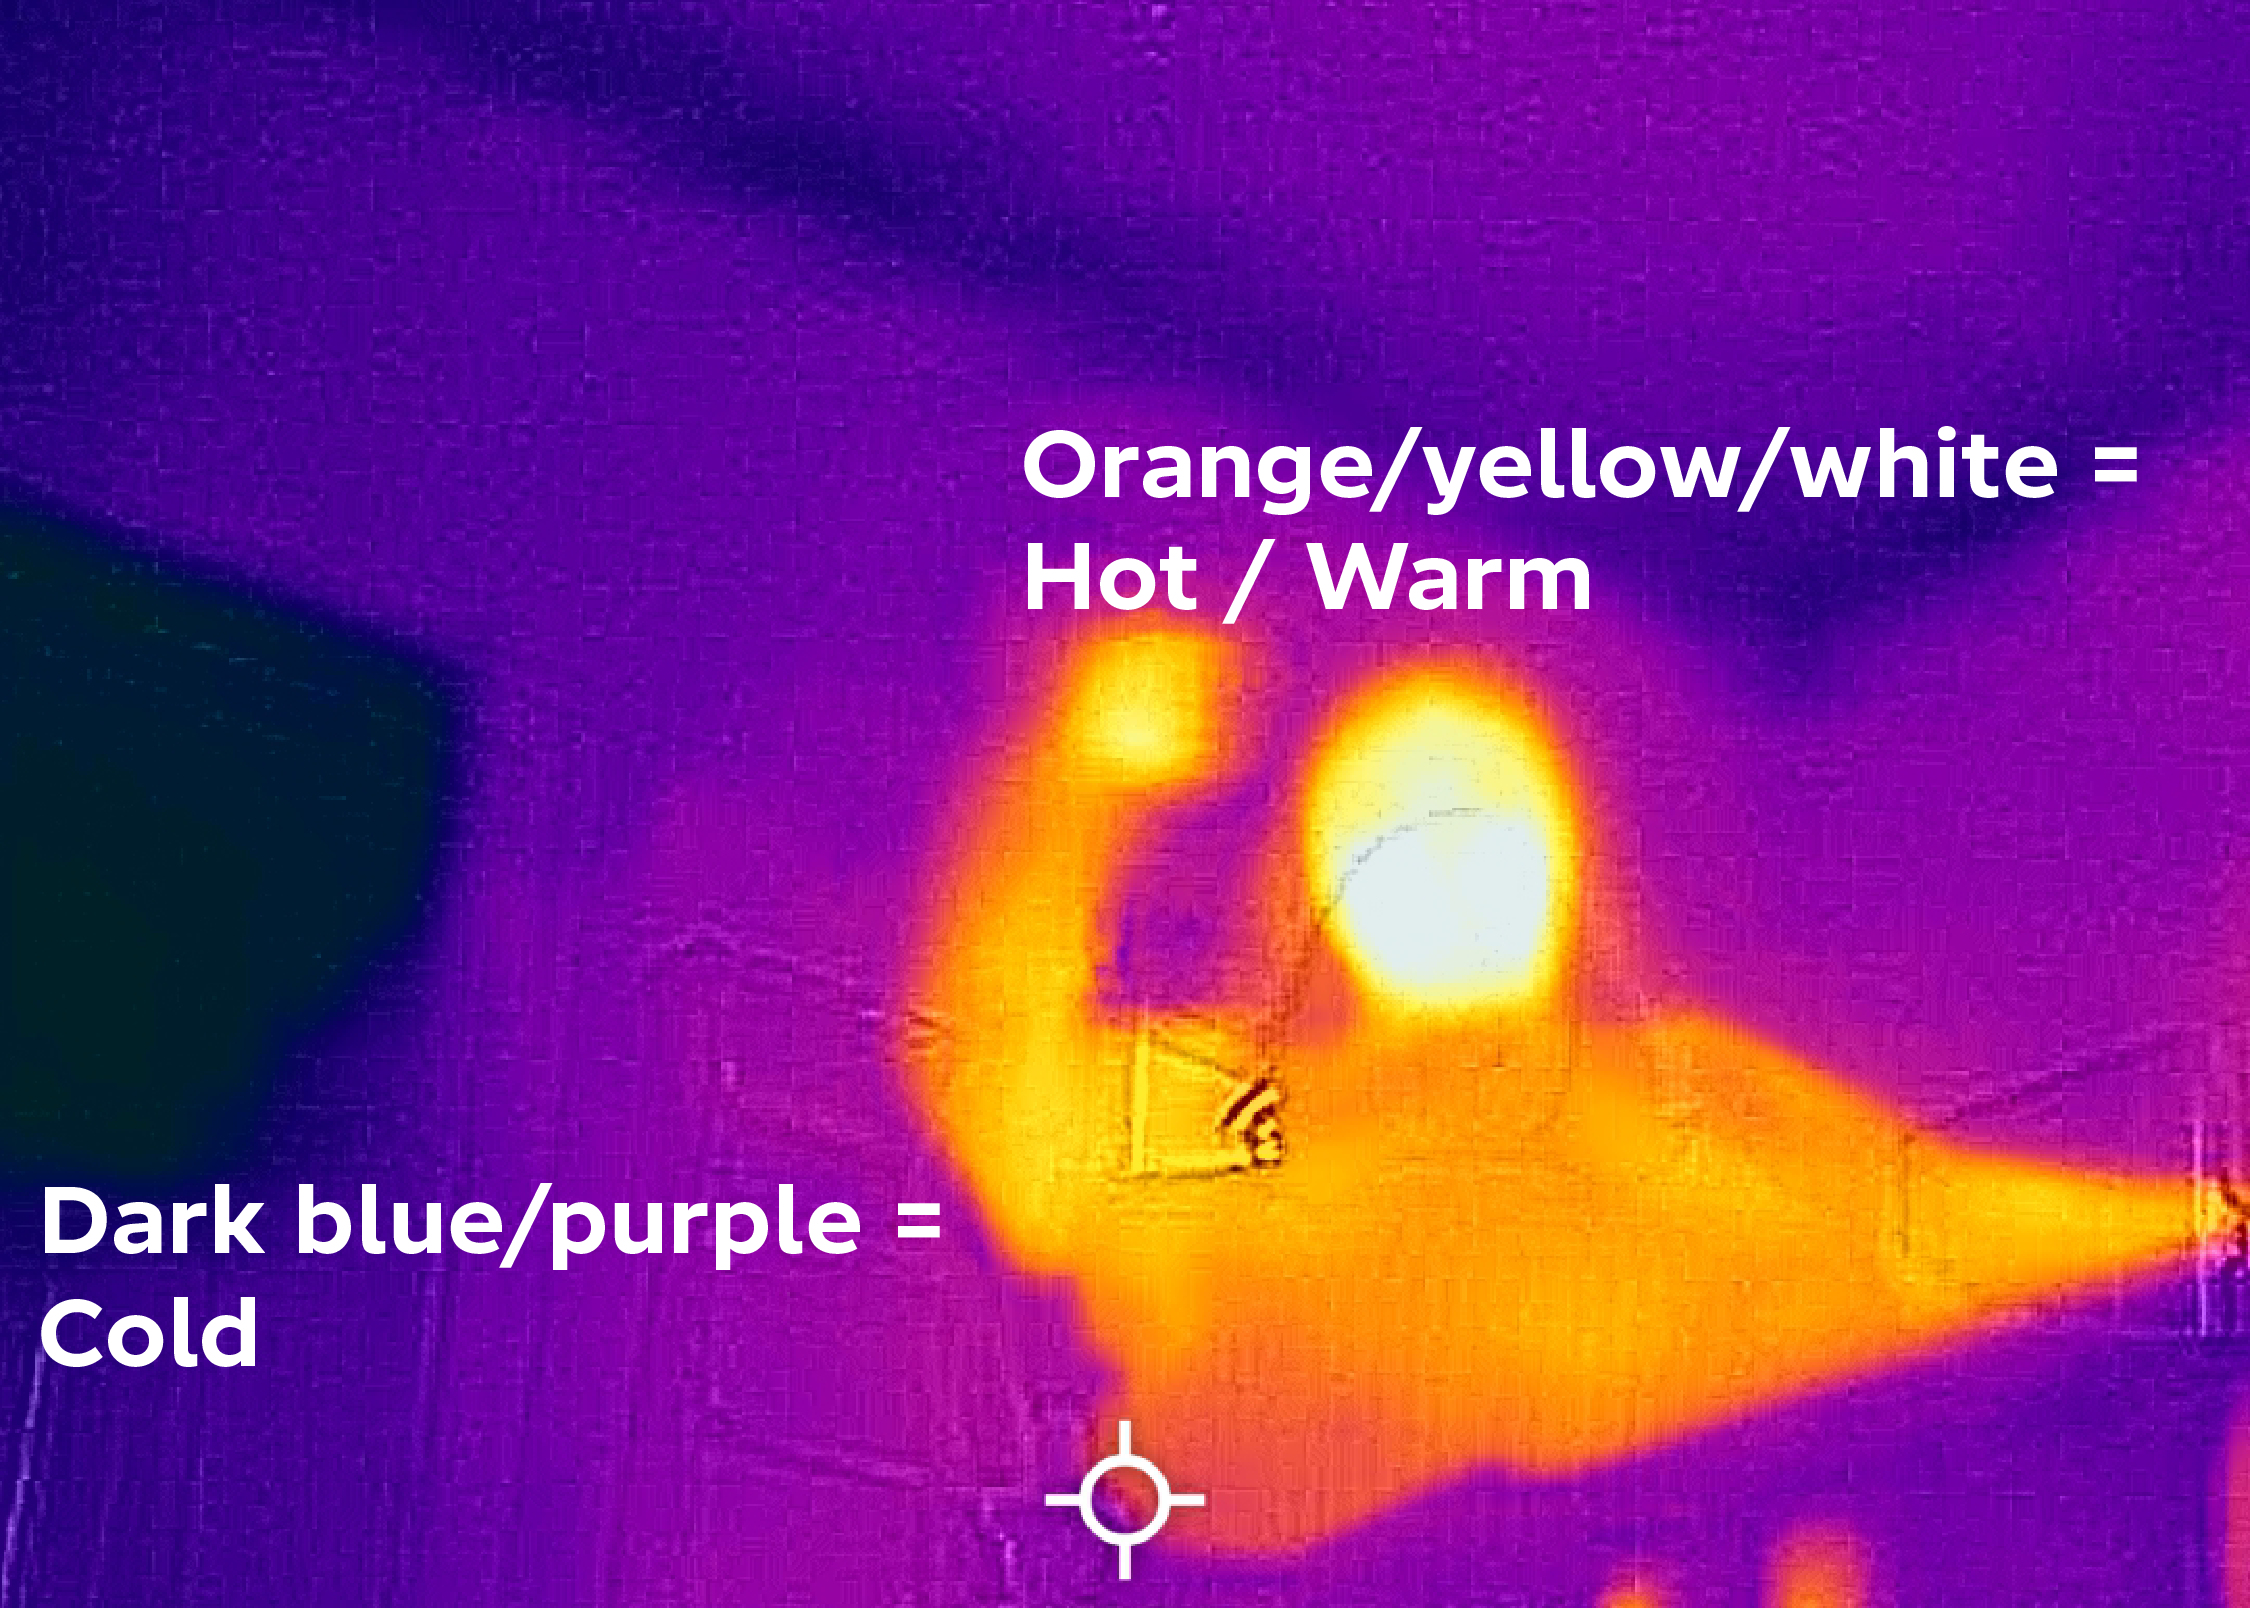
What do the colours mean?
**Orange/yellow/white colours
**This mean the area is warm - the brighter the colours are, the hotter the area is.
**Dark blue/purple
**This mean the area is cold - the darker the blue, the colder the area is.
Whilst using your camera outside your home...
You want to see the cold blue colours. This would mean your heating is being kept inside your house and you're not wasting your energy use on heating the sky.
If you see bright yellow/white colours on your walls, roof or windows, focus on these areas when looking to improve insulation.
Whilst using your camera inside your home...
You want to see the warm yellow colours. This would mean cold air isn't coming in and your heating isn't escaping out.
If you see dark blue colours, focus on these areas when looking for draughts to plug and areas to better insulate.
From inside your home, darker, cooler spots show where cool air is coming in.
From outside your home, reds, whites, and warmer colours show where heat is leaking out.
You might end up blocking particularly draughty windows, or sealing especially airy doorways.
Doors
To block draughts at the base of your door, you can buy a cushion draught excluder (~£7) or make one by stuffing tights with socks, rice, plastic bags or any spare material you have. If you're feeling a bit more creative, you can sew material into shape and fill with whatever you have available (here's a tutorial on making your own draught excluder with stuff from around the house). The photos below show a draughty door - we know this because of the dark blue areas around the door. The photo on the right is lighter in colour at the base of the door where a draught excluder (a rolled up old towel) has been placed. The lighter colours show that the area is now warmer and the draught is being blocked. Easy remedy!
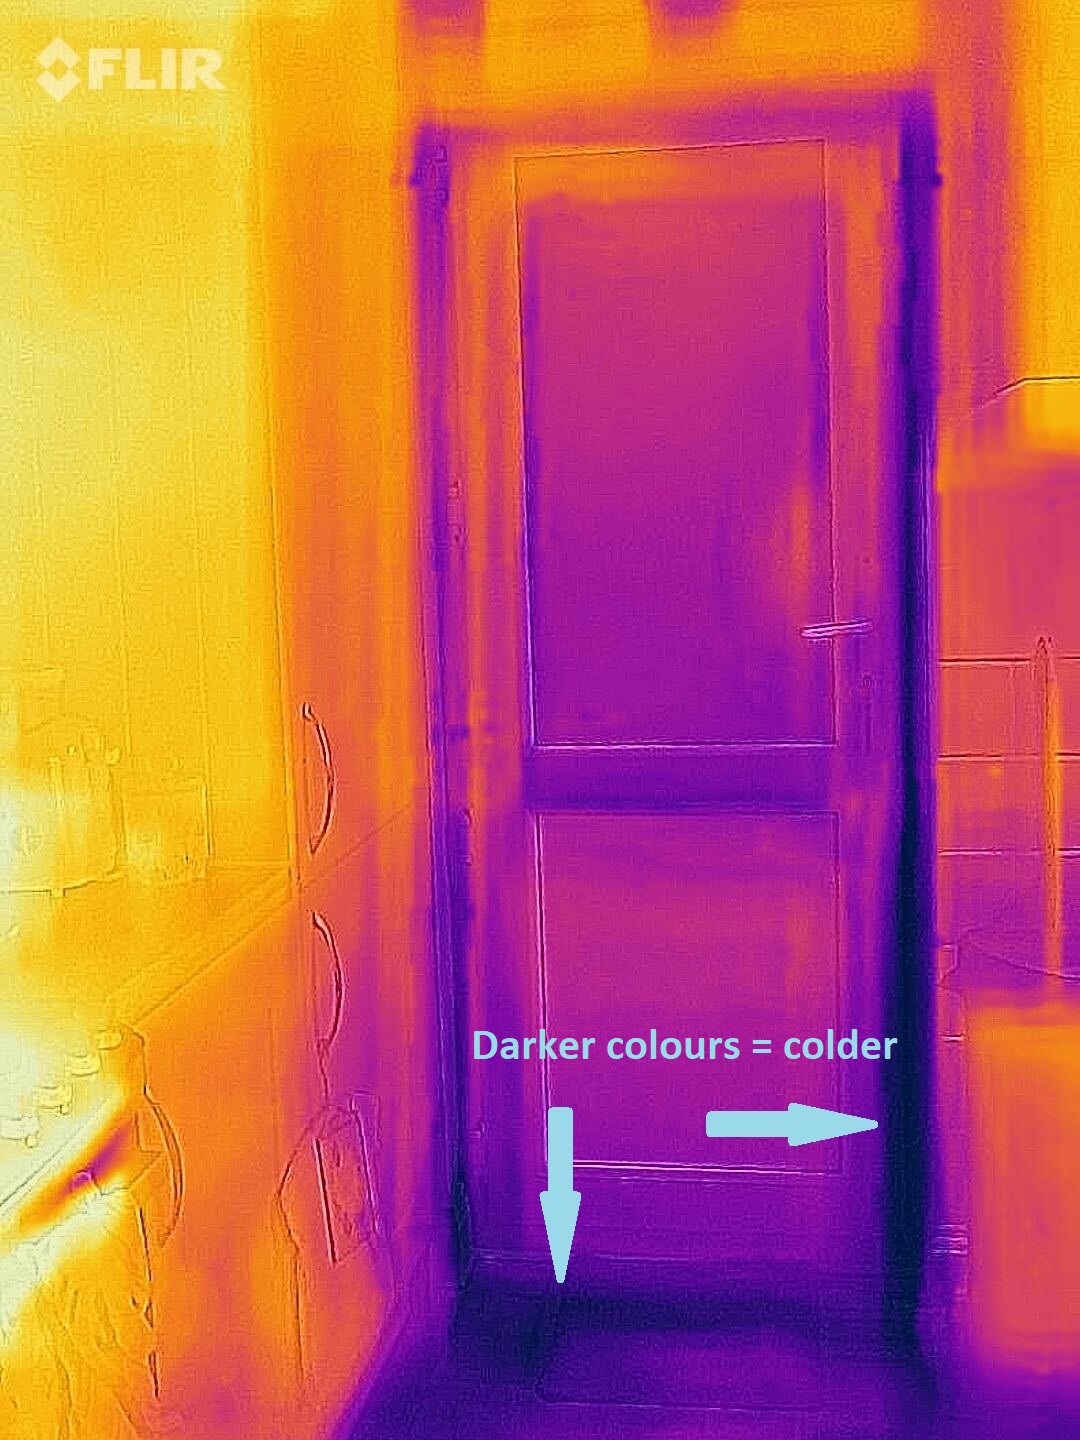
Draughty door without a draught excluder vs with a draught excluder
If you'd prefer a fixed draught excluder, you can install a brush strip or hinged-flap draught excluder (~£7). Here's a tutorial on how to install a brush strip draught excluder.
For draughts around the edges of doors, use self-adhesive draught-proofing strips. Foam strips are the cheapest option (~£5) but may not be long-lasting. Other options include plastic or metal draught-proofing strips. Here's a step by step guide on how to install self-adhesive draught-proofing strips.
Letter boxes and keyholes can also be draught-proofed using a metal keyhole cover (~£3) and a letterbox brush/flap (~£5).
Closing curtains in front of external doors helps to block the cold out and trap the heat in. The photo below on the left has lots of dark blue areas. This shows that cold draughts are coming in through gaps around the door frame and the window is poorly insulated (single glazed). The photo on the right, with the curtains closed, is much lighter in colour. This shows that the area is now warmer as the curtain is blocking the draughts out and trapping the heat in.
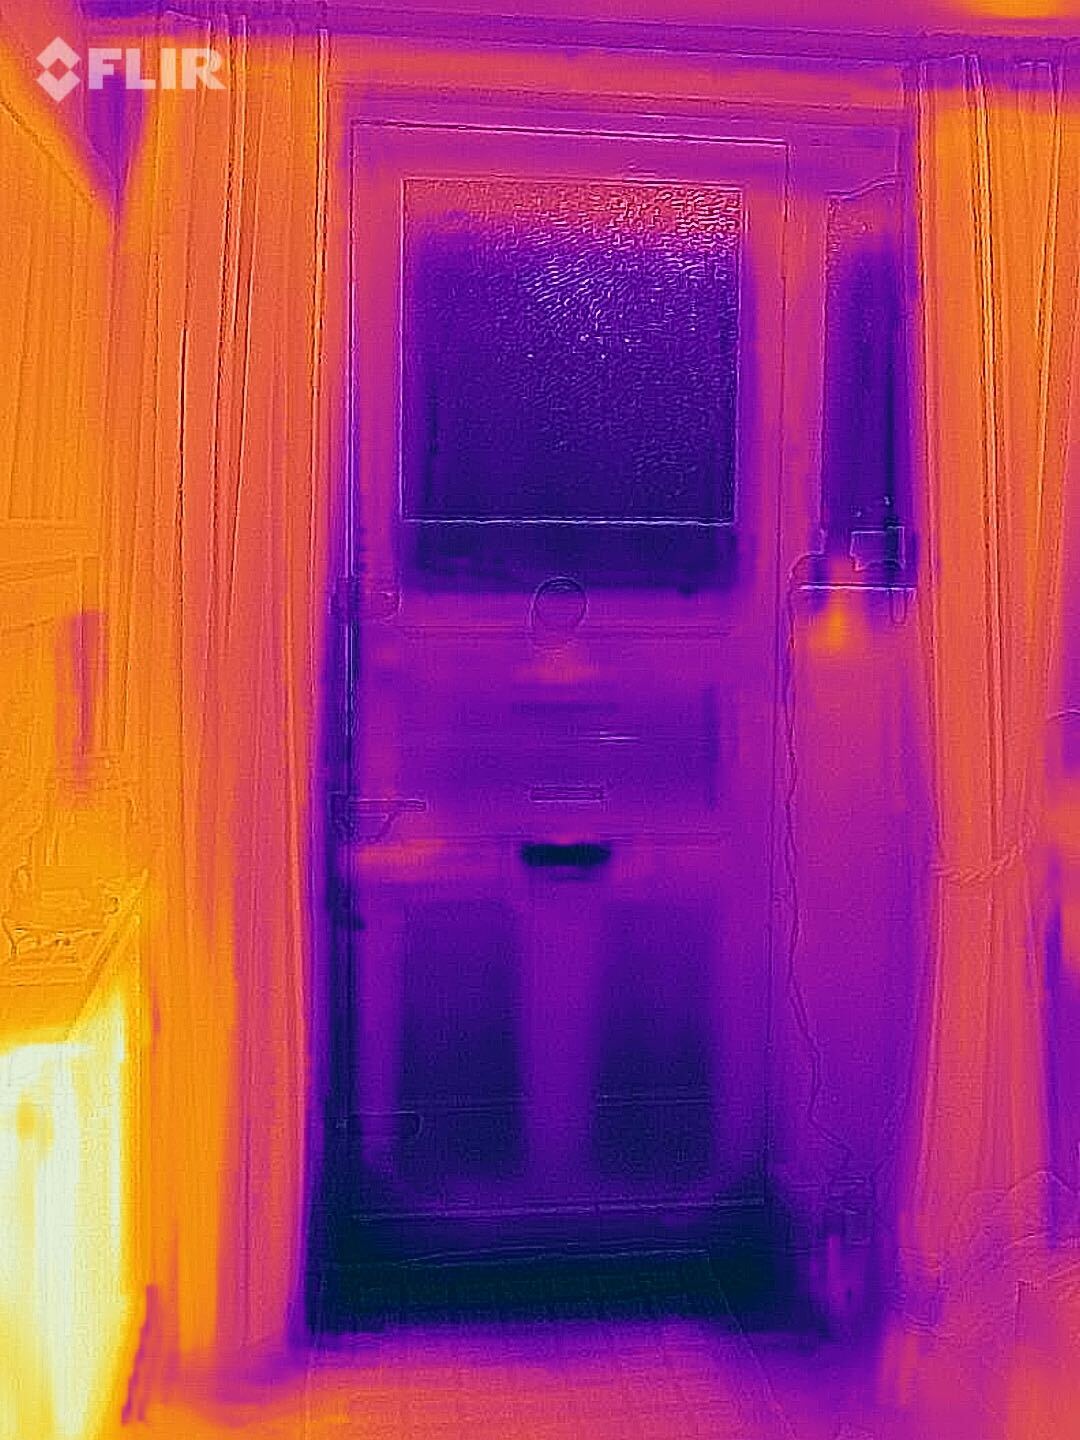
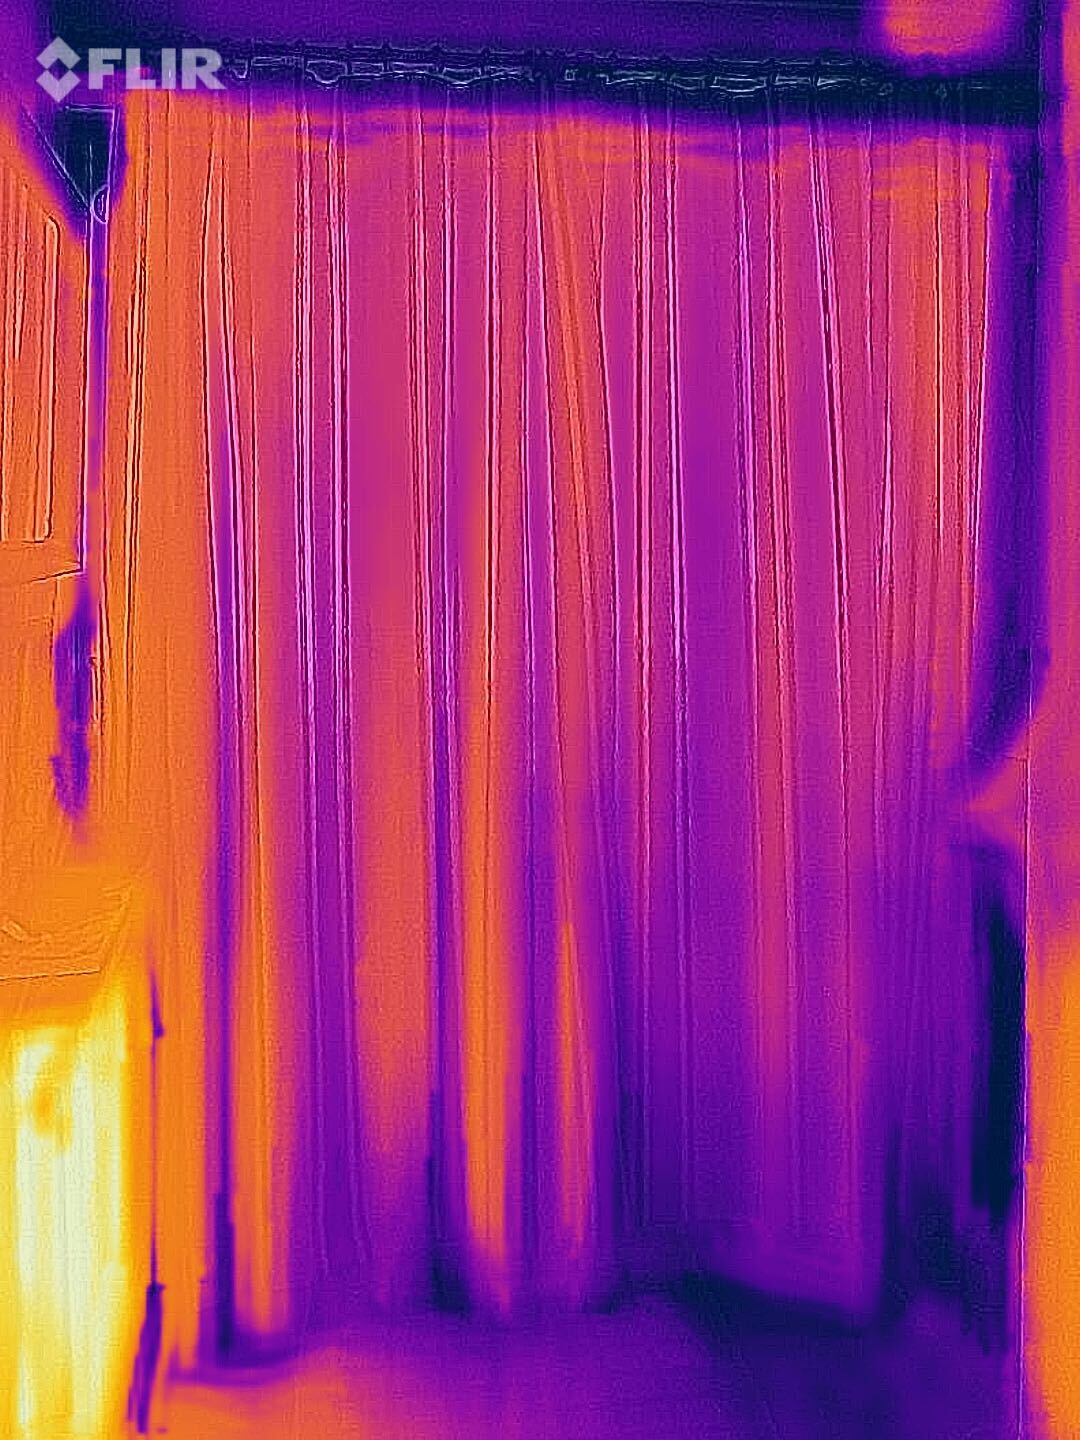
Draughty front door with curtains left open vs curtains closed
Windows
Whilst the sun is shining, keep curtains/blinds open to let in the free heat from the sun. When the sun sets, close curtains/blinds to keep the heat in and the cold out. Curtain liners (or even a shower curtain) can be added during the colder months to thicken existing curtains.
Draught-proofing strips can also be used around windows that open. Silicone sealant (~£5) can be used to seal any draughty gaps around the edges of windows.
Secondary-glazing window insulation film (~£8.50) can be used to create a temporary double glazed window effect to reduce heat loss during winter periods.
Unused rooms
As heat naturally flows from warmer to cooler spaces until there’s no temperature difference, keeping the doors of unused and unheated rooms closed, saves wasting your valuable heating.
A cushion draught excluder can also be used at the base of the door.
Loft hatches
A loft hatch insulation pillow can be purchased (~£24) or made by stuffing a black bin bag with fibreglass, old cushion stuffing or any spare material. It can then be secured to the loft side of the hatch using duct tape.
Draught-proofing strips can also be used around edges of loft hatches to seal any gaps.
Extractor fans
Leaving an extractor fan on can chill your whole house, so remember to turn it off when you've finished using it.
You can get a timed extractor fan to help ensure it's not left on unnecessarily.
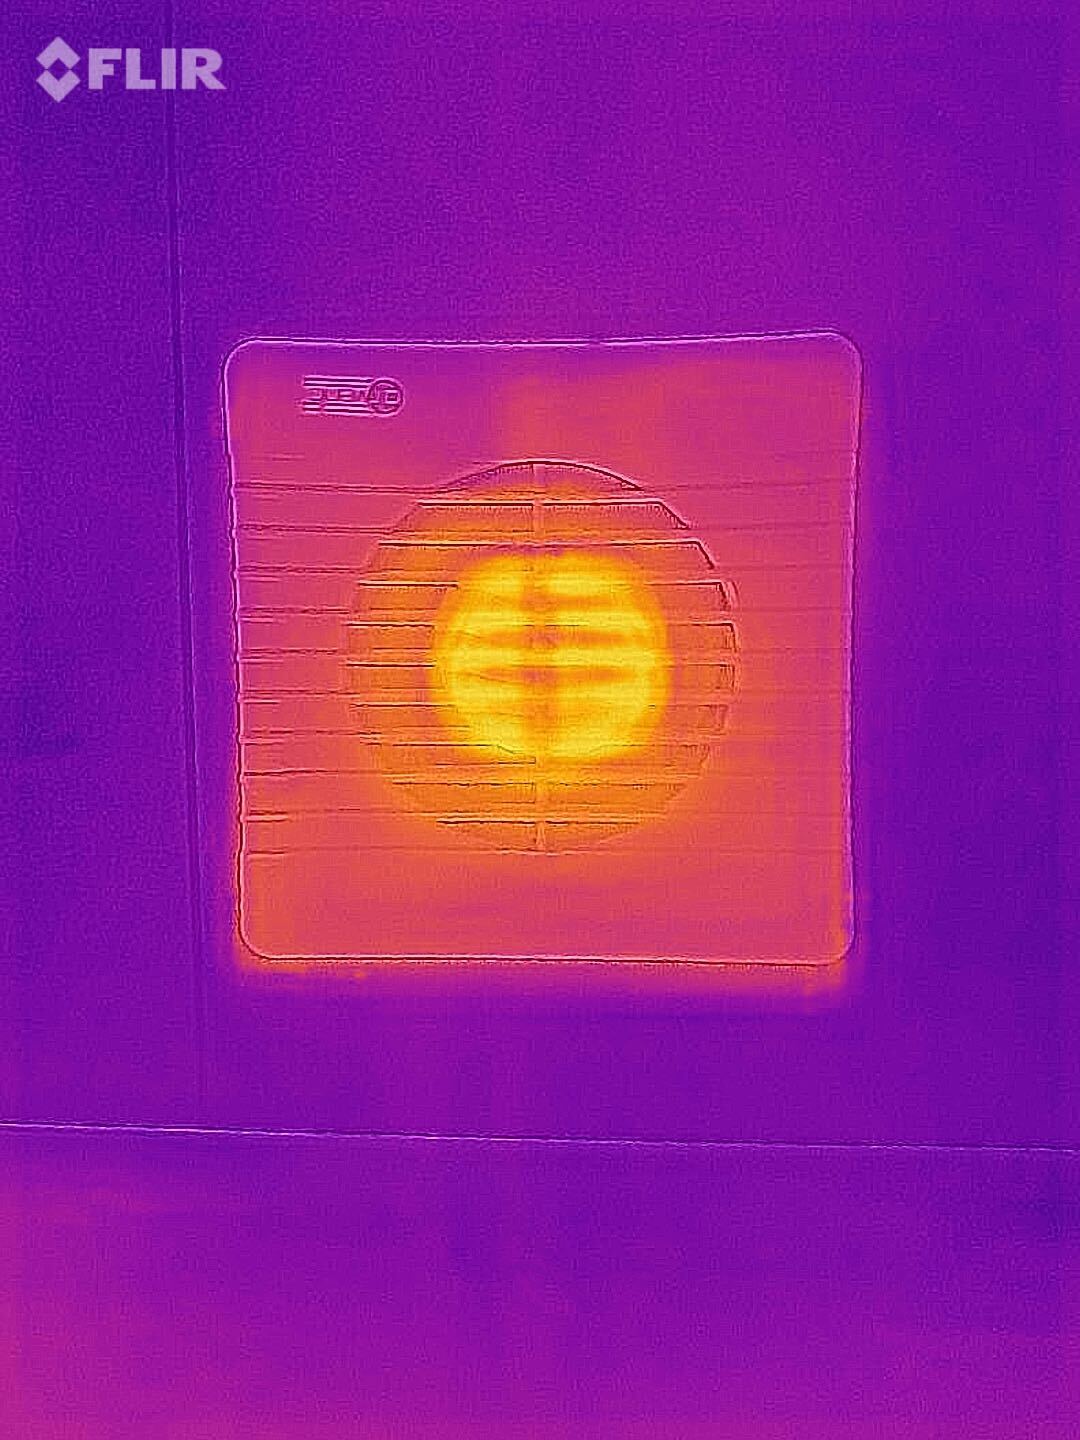
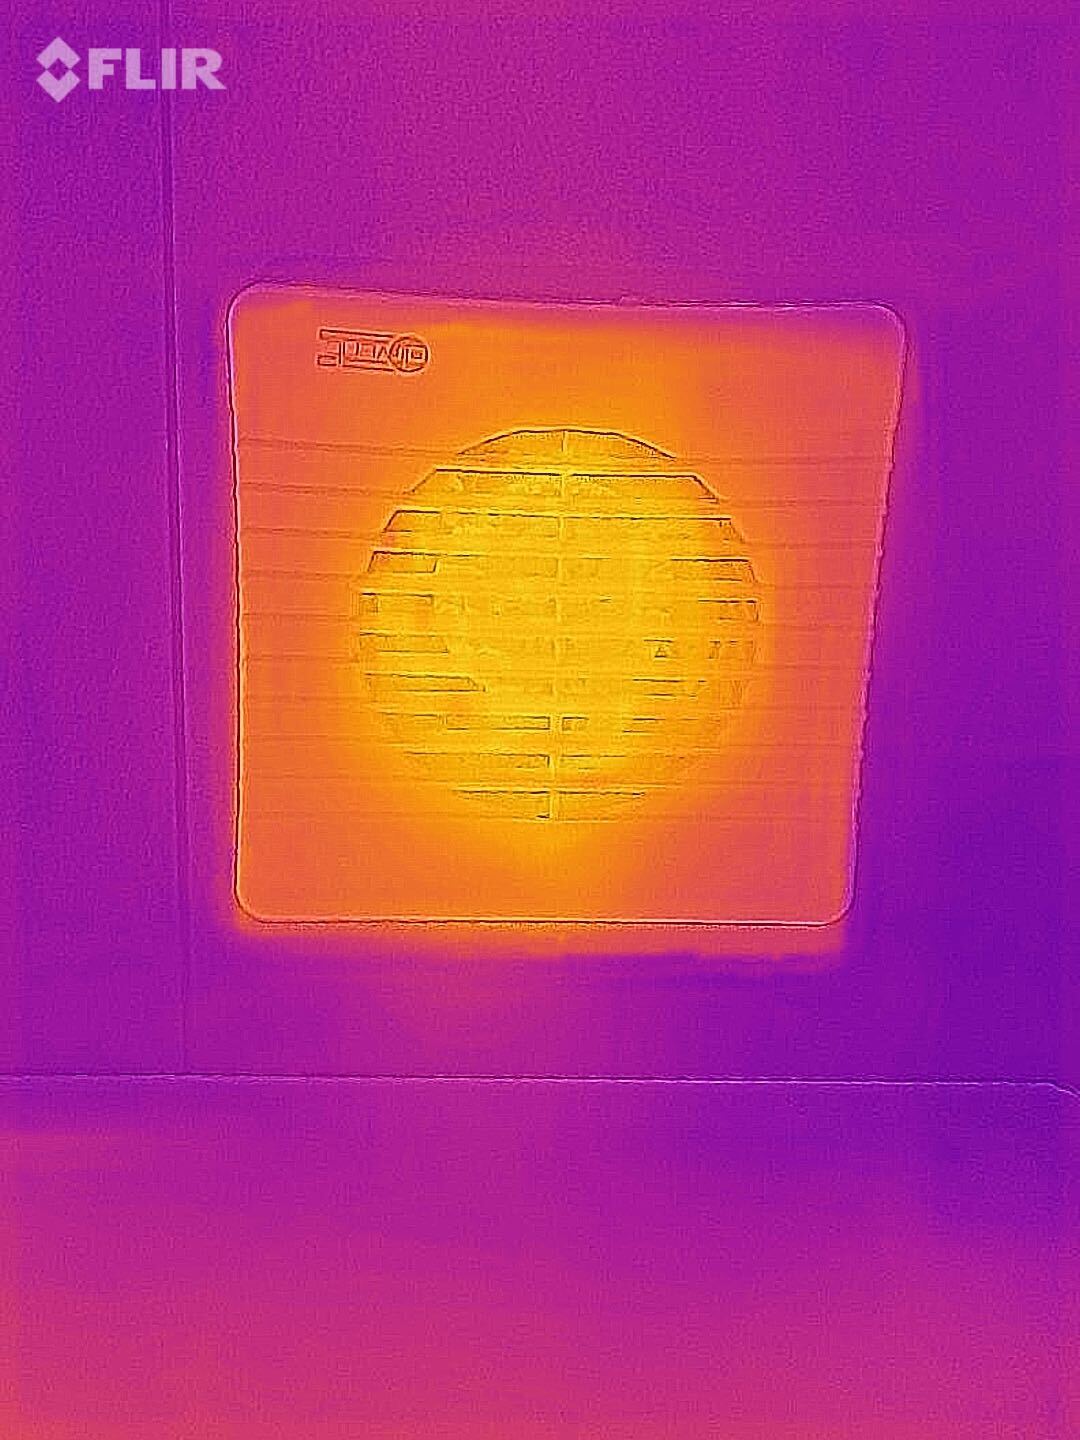
Extractor fan left on vs extractor fan turned off
Chimneys
If your chimney is still used, you can buy or make your own removable fireplace guard to help reduce the draught. You just need some spare plywood or thick cardboard cut to size and insulation tape/kitchen foil. Whilst the fire is off, fit it into place in your fireplace.
A removable chimney balloon (£16) or a chimney draught excluder (~£22) can be placed up the chimney to prevent heat loss whilst the fire is off. If you use one of these, don't forget to remove it before lighting the fire!
If your chimney is no longer used, consider having it capped by a professional (~£150).
Floorboards and skirting boards
Place a rug (or leftover cuts of carpet) over exposed floorboards to reduce draughts through the gaps.
Filler can be used to seal gaps in your floor/around your skirting boards - it is best to use filler that can tolerate movement as the boards can contract and expand.
Radiators
Radiators need space to heat your rooms - move any objects obstructing your radiators such as sofas, and ensure curtains don't hang in front of them.
Dust that builds up between the fins of radiators makes them less efficient - try to remove dust build-up using a vacuum and radiator duster (~£5). If you have radiator covers.
Trapped air in radiators also reduces their efficiency - if there are cold spots on your radiators, it's a sign they need bleeding to release trapped air.
A shelf positioned just above a radiator helps to push heat forward into the room, rather than letting it rise to the ceiling. You can find easy to install, clip-on shelves in most hardware/DIY shops.
Insert radiator reflector panels behind radiators (most effective on radiators located on external walls) to reflect heat back into the room, instead of letting the heat escape out through an external wall.
Hot water tanks and pipes
A hot water cylinder jacket (~£15) can be fitted onto your hot water tank to reduce heat loss and therefore keep your hot water hotter for longer.
Exposed hot water pipes can also be insulated using a foam tube that covers the pipes between your hot water cylinder and boiler.
Making changes to your home
If cold draughts are ignored, your heating has to work harder to keep you warm, increasing your energy bills and your carbon footprint... and no one wants that. So plug those draughts and stay warm this winter!
We'd love to see any nifty tips you come up with to stop those pesky draughts! Please share your photos with us on Twitter or Instagram @octopusenergy
Check out what our customers are doing to improve their home insulation!
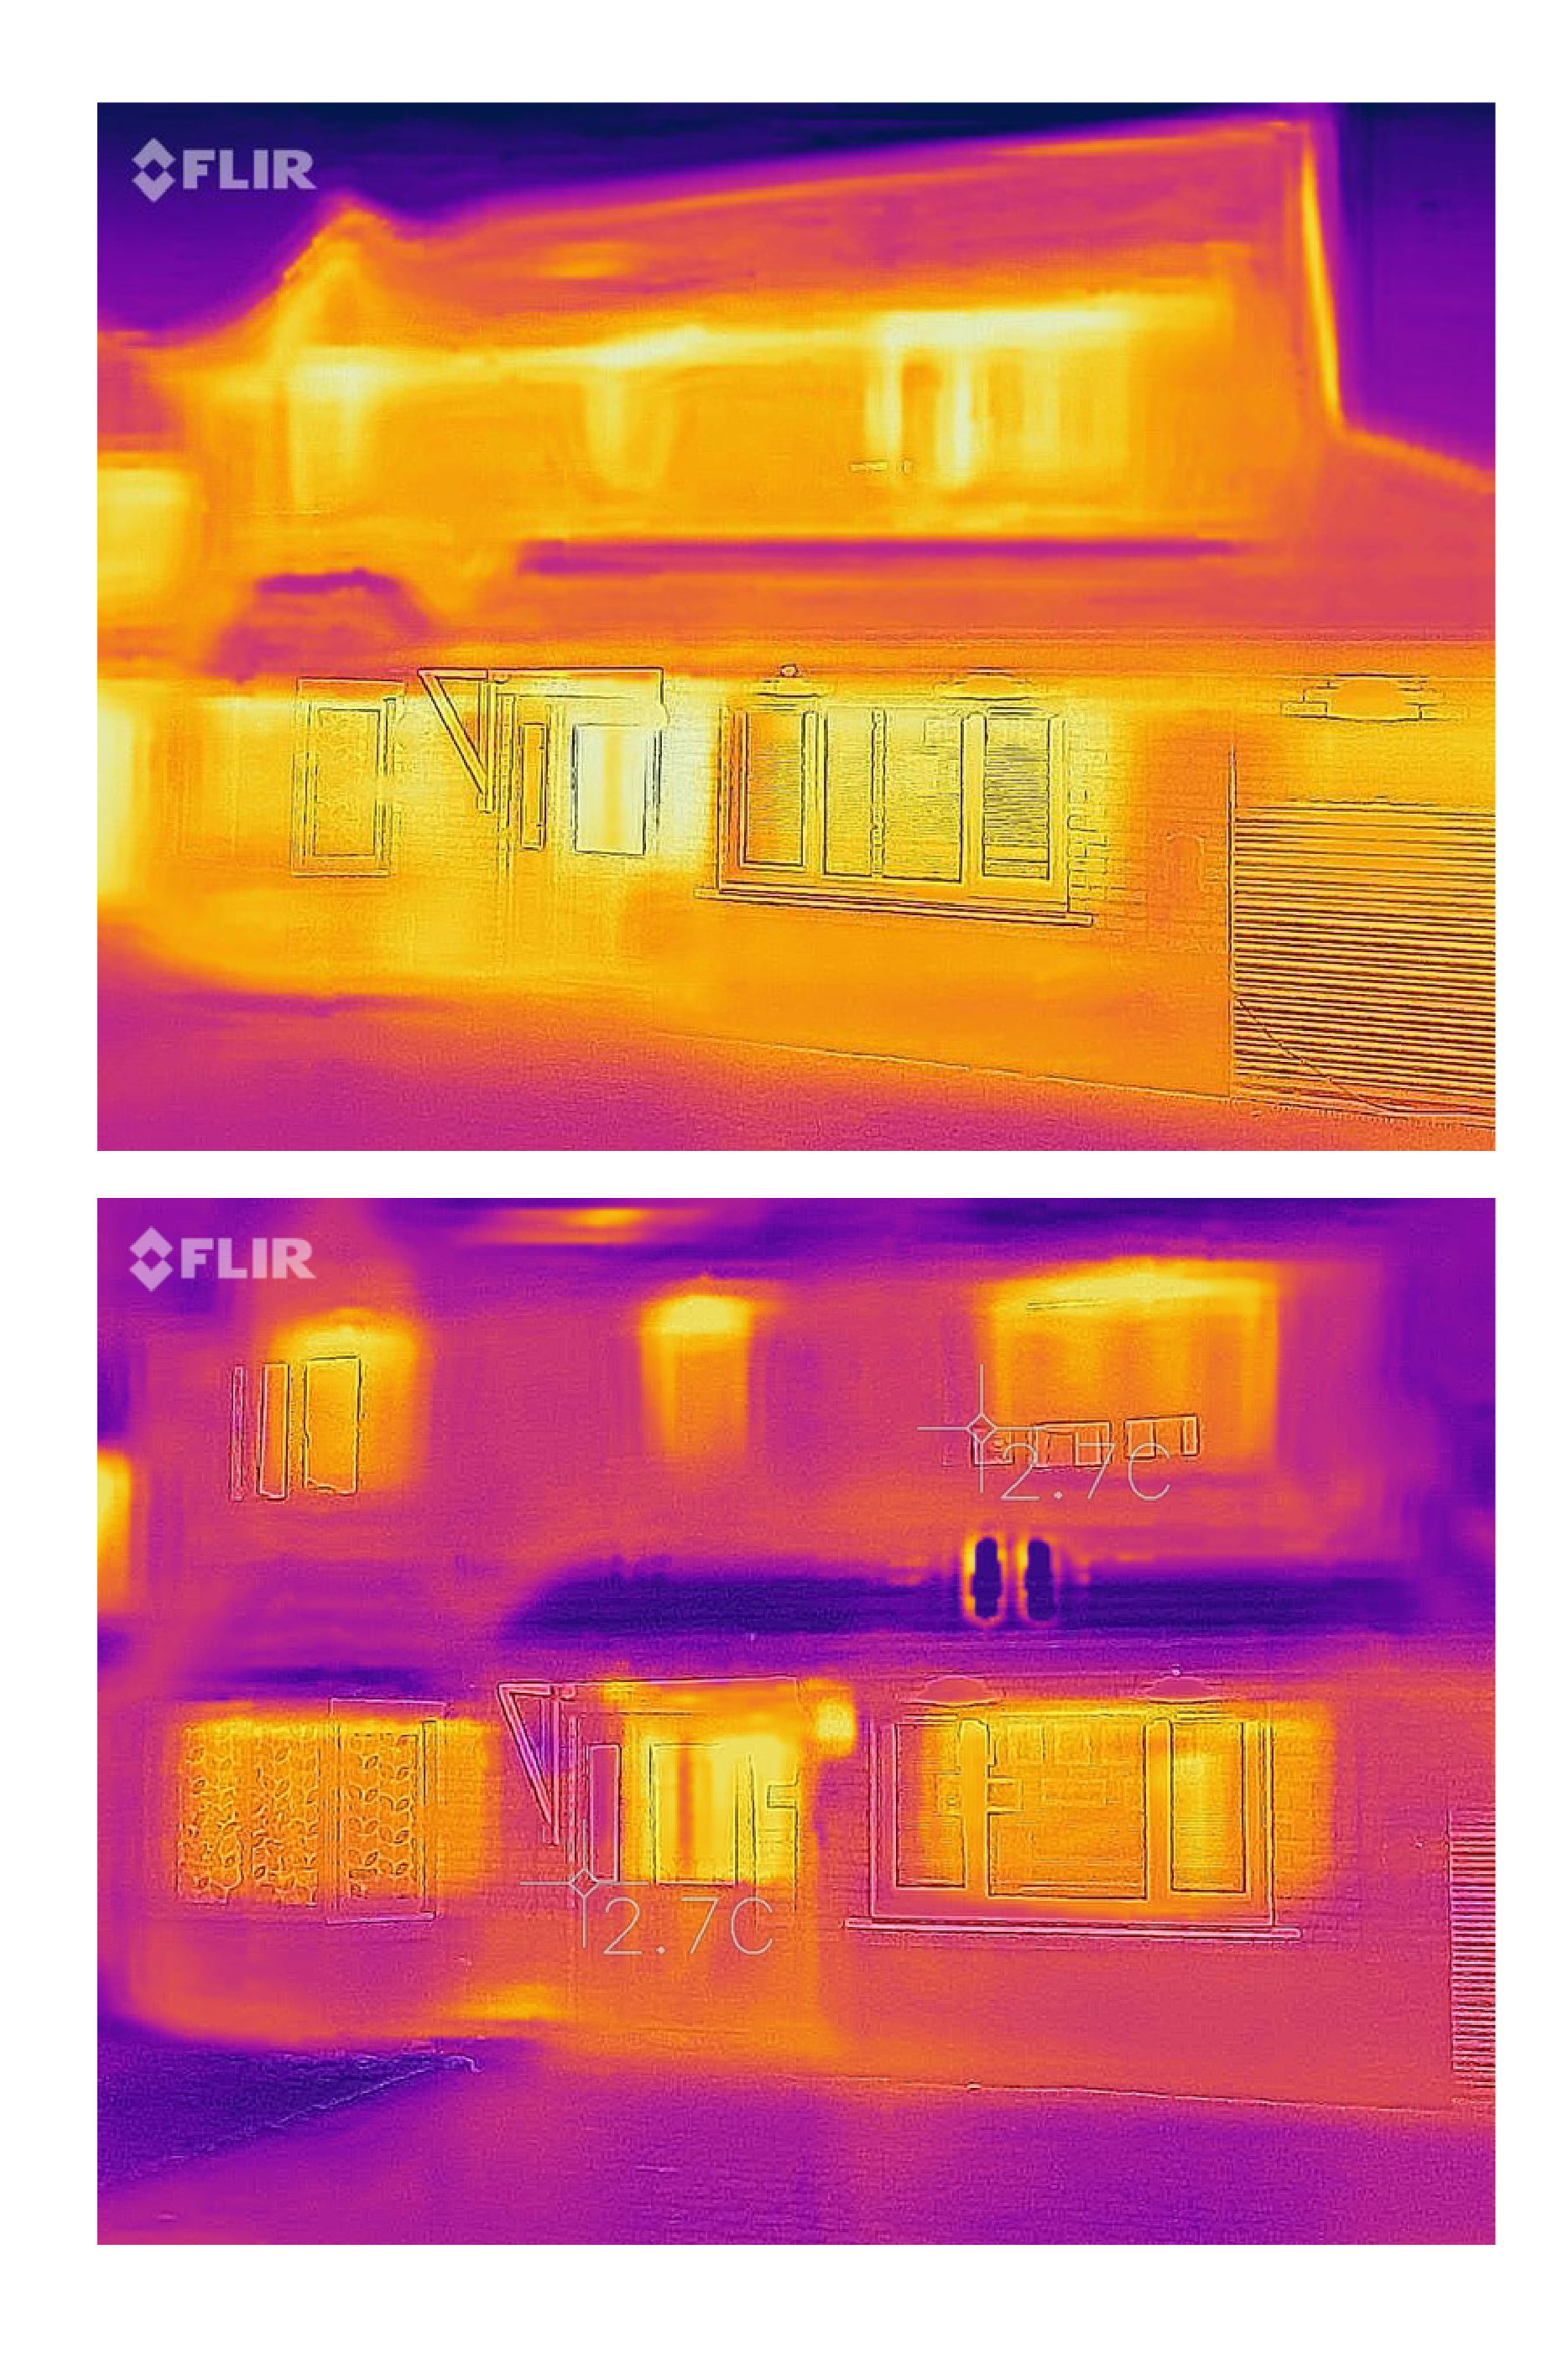
Our customer, Grahame had cavity wall insulation, capturing great before and after photos. The photo below on the left shows Grahame's house without cavity wall insulation. The bright colours indicate that a lot of his heating is leaking out through the poorly insulated walls. The photo below on the right shows Grahame's house with cavity wall insulation. The walls are much darker in colour, showing that the external walls are now colder and significantly less heat is escaping out into the atmosphere. Cavity wall insulation can save you up to £160 a year on heating bills!
Frequently Asked Questions
Please check that your phone is updated to the latest Operating System
If you have Android 11 installed on your phone and the FLIR ONE App is crashing, or randomly stop connecting to your FLIR One (USB-version) or FLIR One Edge Pro.
Try the following troubleshooting steps:
Re-discover the camera by going to the background, and then back to the app.
Restart the app (may have to be performed several times)
Restart the camera.
Do a factory reset on the camera. (FLIR One USB version by holding down the power button for 10seconds. The FLIR One Edge Pro reset instructions can be found here)
Restart your phone.
Lastly, if none of the troubleshooting above works. We recommend that you update your phone to Android 12 or 13, as the app connection to the cameras is more stable with these OS versions.
Go to the Advanced settings on your Android phone and enable USB OTG. Once is was enabled, try the camera again.
FLIR have made a handy video on how to set up your wireless camera:
https://www.youtube.com/watch?v=EXwN_UOlg9I&ab_channel=TeledyneFLIR
To reset your FLIR ONE Pro, Pro LT, or Gen3, please follow these steps:
Connect the camera to the charger and wait to see the LED showing it is being charged (Charger output needs to be 5V and at least 1A)
Wait for 1 hour until the battery is fully charged
Press and hold the power button for 30 seconds
Open the FLIR ONE App (do not connect the camera yet)
Turn on the camera and wait until the power blinks green, then connect it to your device.
Sometimes the cameras needs a hard reset to get them working.
After the factory reset, you need to establish the connection between your camera and your mobile device again.
Follow this procedure:
1. Turn off the FLIR ONE Edge camera.
2. Make sure the battery is charged above 50% and the USB cable is disconnected.
3. Press and hold the On/Off button. Don't let go until the LEDs show a steady light. (The LEDs will blink several times, first with low and then with high brightness and increased intensity)
4. Let go of the button.
5. The camera will now reset for a couple of seconds and then do a normal restart.
After the camera has completed the restart, you can now connect to it again.
Video instructions here:
If the camera is not working as expected, a factory default reset can be performed on the FLIR One Gen3 or Pro.
After the factory reset, you need to establish the connection between your camera and your mobile device again.
Follow this procedure:
1. Connect the camera to the charger (required charger: 5V and at least 1A), or your computer, until you see the charging LED turn on.
2. Wait one hour until the camera's battery charges.
3. Reset the camera by pressing and holding the power button for 30 seconds.
4. Open the FLIR ONE App (do not connect the camera yet!)
5. Turn on the camera and wait until the power LED turns blinking green.
Now connect the camera to the phone.
Stream will start automatically.
Video instructions here:
https://flir.custhelp.com/app/answers/detail/a_id/6436/~/flir-one-gen3-or-pro-factory-reset
If your camera still has issues after the previous troubleshooting, please Email FLIR directly or call FLIR on their Tech Support Phone Lines.
The cameras cannot save or store photos. All photos taken by you will be sent to your phone.
Published on

Aliya Khan
In-Person Energy Conversations