
Everything you need to know about using Octopus Charge
Get to grips with the app settings in just six steps
Once you've set up Octopus Charge in your Octopus account, it will be in manual control by default. Manual control lets you create schedules, boost charge and control settings for your charger.
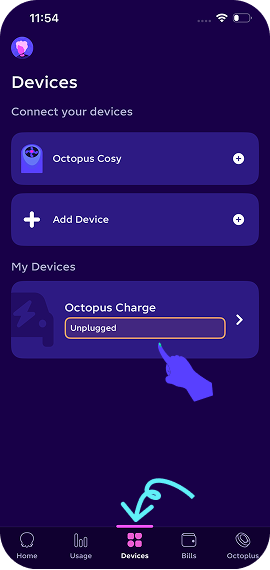
Step 1: Open the Octopus Energy app
Head to the 'Devices' tab by tapping the menu icon across the bottom of the screen. Select 'Octopus Charge' to get to your charger's controls and settings.
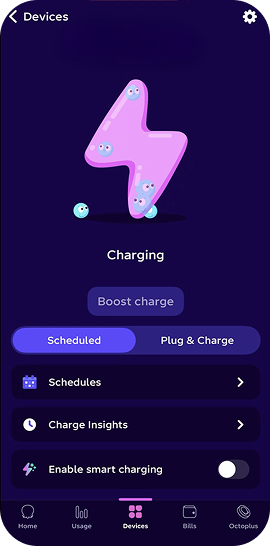
Step 2: Choose your charging mode
On the control screen, you can switch between:
Scheduled: Charges only at the times you set. The default time is: 00:30-05:30.
Plug & charge: Charges instantly whenever your EV is plugged in.
Boost charge: This lets you charge outside of your schedule. This will only be available if the charger is plugged into your car.
Charge insights: Where you can view your charging history.
Enable smart charging: If you’re an Intelligent Octopus Go customer, you can enable smart charging by turning the toggle on. This helps you to get the most from your Octopus Charge – more on that in a second.
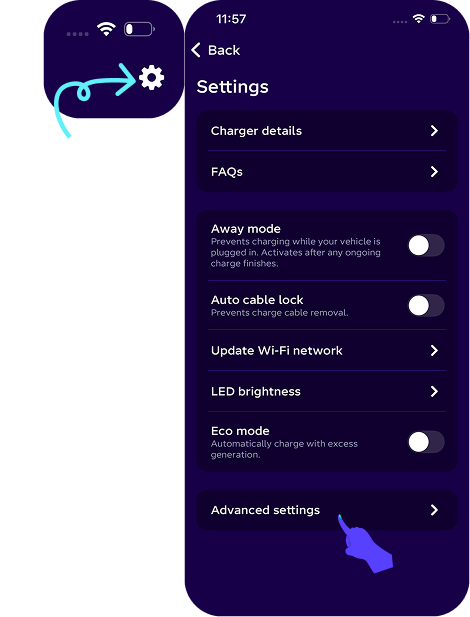
Step 3: Explore your settings
Tap the cog icon to take you to settings. You can then access more options including:
Charger details: Here you can find the unit serial number, bluetooth PIN and access point passwords.
Away mode: Turn this on to stop the charger from charging. Turn it off to return the charger to its previous mode.
Auto cable lock: If you have an untethered charger, this will lock the cable to the charger. It can be turned on and off. If you want to temporarily disable the lock, you can do this by pressing and holding the 'Hold to unlock' button on the control screen. When the cable is plugged back into the charger and EV, it will return to being locked.
Update Wi-Fi network: If your charger is set up in Wi-Fi mode, and you want to change the Wi-Fi network and/or the password that your charge is connected to, here's where to do it.
LED brightness: Adjust the brightness of the LED on the front of your charger to between 5% and 100%.
ECO mode: This powers your EV using your surplus solar energy. Charging will automatically begin when your system produces more than 6 amps of excess generation. Be sure to check your feed-in rates to make sure this is the best option for you.
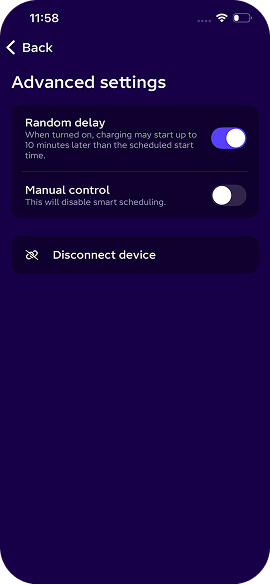
Step 4: Check out your advanced settings
Random delay: Here, you can switch off the random delay (from 1-10 minutes) which is introduced at the start of a charge. The end of the charge session will stay unaffected. Note: Random delay is used help balance peak demand on the electricity grid.
Manual control: Smart control is disabled when you switch this on. This option is only visible if you are in Smart control.
Disconnect device: Only use to this option if you want to disconnect your charger from the Octopus platform.
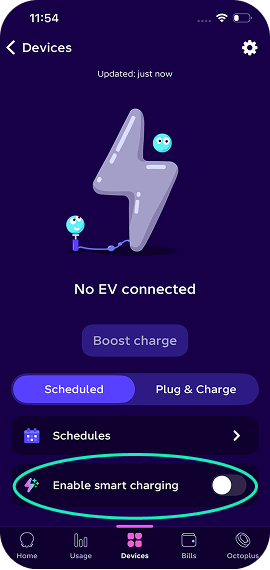
Step 5: Enable smart charging
If you are an Octopus Energy electricity customer, you may benefit from our smart charging option. This will allow you to access off-peak energy between 11:30pm-5:30am.
You might sometimes be able to take advantage of off-peak charging sessions, so make sure to enable your push notifications to find out.

Step 6: Viewing the default schedule or set new times
At the top of the page you can see the status of your charger (i.e. if the vehicle is plugged in), you will also be able to see your scheduled charging.
Ready by time: tap this option to choose exactly when you want your charge to be finished by in the morning.
Charge to add: This option sets how much charge you’d like to add to your EV.
If you have enabled smart mode, make sure you've switched over to our Intelligent Octopus Go tariff.
If you prefer to manage things yourself, switching to manual mode is easy. Just follow these steps:
Open your app
Go to the Devices tab at the bottom of the screen.
Select Octopus Charge from the list of devices.
Tap on the cog icon in the top-right corner to open the settings tab.
Select advance settings down at the bottom.
Toggle ‘Manual Control’ to ON. This will disable smart charging and give you full control over when your car charges.
Note: While in manual mode, your car will charge at your standard rate.
Most EV drivers can start saving with smart charging right away!
An Octopus Energy Account: You’ll need to be on one of our domestic electricity tariffs.
A Smart Meter: You need a smart meter that can send us half-hourly readings. This is usually a newer (SMETS2) model or a specific type of older (SMETS1) meter.
A compatible Car or Charger:
Many brands like Tesla, VW, Audi, and Ford can connect directly to our app. If your car isn’t directly supported yet, don't worry! You can still join if you use a smart charger like an Ohme (Home Pro/ ePod), Indra (Smart PRO), Hypervolt (Home 3 Pro), or Myenergi Zappi.
Contact us
Our online support hub is packed with FAQs, troubleshooting, guides and top tips to help you get the most out of your EV charger - all in one place.
Need support after installation needs to be changed to:
Email: hello@octopus.energy
Call us: 0808 164 1088 (open 9am - 5pm Monday to Thursday, and 9am - 4pm Friday)
For the fastest response, fill out this form to raise any issues. Alternatively, you can email us on charging@octopus.energy or call 0808 196 6842.
Check out our complaints process.
Getting started with your Octopus Charge
EV Charger support
EV Smart Tariffs
An EV charged on Intelligent Octopus Go could save you £100s on your fuel costs vs a petrol car.
Use our EV savings calculator to compare today's fuel costs at your local petrol station to current home charging costs on Intelligent Octopus Go and get an estimate for how much you'd save. Octopus Charge is designed to work with Intelligent Octopus Go and many other chargers and EVs are compatible, too. Check if you're eligible for Intelligent Octopus Go here.
Save up to 85% vs public charging when you power up at home with Intelligent Octopus Go.
A slow or fast charge (<50 kWh) with one of the UK’s public charging points costs an EV driver 54p/kWh on average (last checked June 2026). With Intelligent Octopus Go, you smart charge from only 7.6p/kWh and could save 85%.
1 - 7.6/54 = 0.85 or 85%
Charge for up to 70% less than average price cap rates.
With Intelligent Octopus Go, you can smart charge eligible cars from only 7.6p/kWh. The average electricity unit rate of a standard variable tariff, based on the October 2026 Ofgem energy price cap for customers paying by direct debit, is 26.32p/kWh. This represents a saving of 71% compared to the average price cap unit rate (1- 7.6/26.32 = 0.71 or 71%).
Please note that savings apply to unit rates only and exclude standing charges. Standard variable rates vary by region, so your actual percentage saving may vary depending on where you live. Check the price cap for your region here.
The UK's most popular EV tariff
In their latest State of the market report, Ofgem shared that 653k domestic customers were on a Smart Time of Use EV tariff in July 2025. More than half were with Octopus, and the majority of them charged with Intelligent Octopus Go.
Last year, our customers typically saved £771 compared to our standard tariff
Over the last year (May 2025 to April 2026), customers on our fixed Intelligent Octopus Go tariff typically saved £771 compared to our standard variable tariff, Flexible Octopus. Calculations are based on comparing actual half-hourly consumption and costs on Intelligent Octopus Go against the costs the customer would have incurred for that same consumption on our Flexible Octopus tariff.
Savings for individual homes vary based on how much electricity you use for your house and EV, and how much you shift towards off-peak hours. Get a quote to compare your rates.
Trusted and recommended by thousands of happy customers
Based on feedback from 4,427 customers who had an EV charger installed between 25th January and 24th March 2026, 81% gave a 9 or 10 rating when asked how likely they were to recommend us to friends or family (on a scale of 1–10).